Now that we have our mapbox integration, we want to open a new page when we click on the city.
Routing
1
| npm install --save react-router-dom
|
Let’s update our main function App in order to create a new route and have two pages:
 1
 2
 3
 4
 5
 6
 7
 8
 9
10
| function App() {
return (
<BrowserRouter>
<Routes>
<Route path='/' element={<MainPage />} />
<Route path='/city' element={<CityPage />} />
</Routes>
</BrowserRouter>
);
}
|
We are now going to slightly change our list in order to open the new page when you click on the link.
In order to do that, we are going to remove the onClick we added in step 1, and use the Link component from react-router.
 1
 2
 3
 4
 5
 6
 7
 8
 9
10
11
| const CityList = (props: CityListProps) => {
return (
<ListGroup>
{props.cities.map((city) => (
<ListGroup.Item key={city.name} action>
<Link to={`/city?lat=${city.lat}&lng=${city.lng}`}>{city.name}</Link>
</ListGroup.Item>
))}
</ListGroup>
);
};
|
We are going to only use the latitude and longitude in order to identify the cities. So we only need to pass them as url parameters for our new page.
The reason for that is that we are going to use weatherbit.io API and using lat/lng is the recommanded way (and I believe most of the weather API are doing the same).
Weatherbit API
First thing first, you’re going to need to create an account on weatherbit in order to get an API key. It’s free, takes 2 minutes and doesn’t require a credit card or anything.
Now that it’s done, we are going to only use one endpoint: Current Weather API.
It’s quite straightforward:
1
2
| const url = 'https://api.weatherbit.io/v2.0/current?lat=35.7796&lon=-78.6382&key=API_KEY'
const result = await axios.get(url);
|
Back to our app, we need to get the latitude and longitude from the url, so let’s use react-router:
1
2
3
4
5
6
7
8
| import { useLocation } from 'react-router-dom';
// [...]
const location = useLocation();
// location.search will be similar to: ?lat=51.507322&lng=-0.127647
const [latqs, lngqs] = location.search.substring(1).split('&');
const lat = latqs.split('=')[1];
const lng = lngqs.split('=')[1];
|
You can move that into a separate method (utils) for clarity (I’ve called it getSearchLatLong).
Calling the endpoint
We are going to need to call the endpoint once the component is first mounted and save it in the state.
Let’s use useEffect and useState for that:
 1
 2
 3
 4
 5
 6
 7
 8
 9
10
11
12
13
14
15
16
17
18
| const CityPage = () => {
const location = useLocation();
const [weatherData, setWeatherData] = useState<WeatherData>();
useEffect(() => {
const getWeather = async () => {
const {lat, lng} = getSearchLatLong(location.search)
const url = `https://api.weatherbit.io/v2.0/current?key=${API_KEY}&lat=${lat}&lon=${lng}`;
const result = await axios.get(url);
setWeatherData(result.data.data[0]);
};
if (!weatherData) getWeather();
}, []);
// ...
}
|
The API will return data like:
 1
 2
 3
 4
 5
 6
 7
 8
 9
10
11
12
13
14
| {
"data": [
{
"wind_cdir": "WSW",
"rh": 58,
"pod": "d",
"lon": -0.1276,
"pres": 1017.9,
"timezone": "Europe/London",
// [...]
}
],
"count": 1
}
|
We are only going to save the first observation (we should only receive one anyway).
Displaying the weather
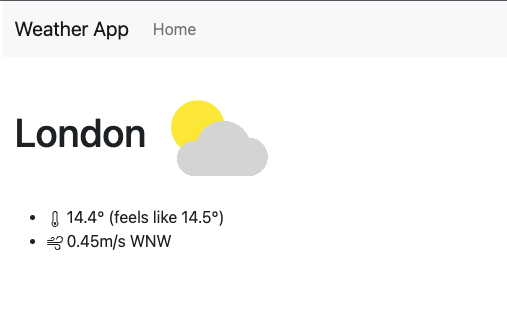
Let’s just display the info we received in a simple way:
 1
 2
 3
 4
 5
 6
 7
 8
 9
10
11
12
13
14
15
16
17
18
19
20
21
22
23
24
25
26
| return (
<Container>
<NavBar />
<ViewContainer>
{weatherData ? (
<>
<h1>
{weatherData.city_name}{' '}
<img
src={`https://www.weatherbit.io/static/img/icons/${weatherData.weather.icon}.png`}
/>
</h1>
<ul>
<li>
<Thermometer /> {weatherData.temp}° (feels like{' '}
{weatherData.app_temp}°)
</li>
<li>
<Wind /> {weatherData.wind_spd}m/s {weatherData.wind_cdir}
</li>
</ul>
</>
) : (<div>Loading...</div>)}
</ViewContainer>
</Container>
)
|
A couple of things to note:
The Thermometer and Wind components are both images from react-bootstrap-icons, so if you want to use it, just install the lib and import the component you want.
Weatherbit does return an icon for the current weather, so we simply are going to use their image. More info can be found here.

In the next tutorial, we will save the cities in the local storage in order to quickly access the ones we’ve looked at already.

